Git 常用命令
Git 是一款版本管理软件,适用目前绝大多数操作系统;GitHub 是一个代码托管平台,与 Git 没有任何关系。只不过 Git 可以基于 GitHub 进行分布式云存储与交互,因此往往需要结合二者从而达到相对良好的 Teamwork 状态。
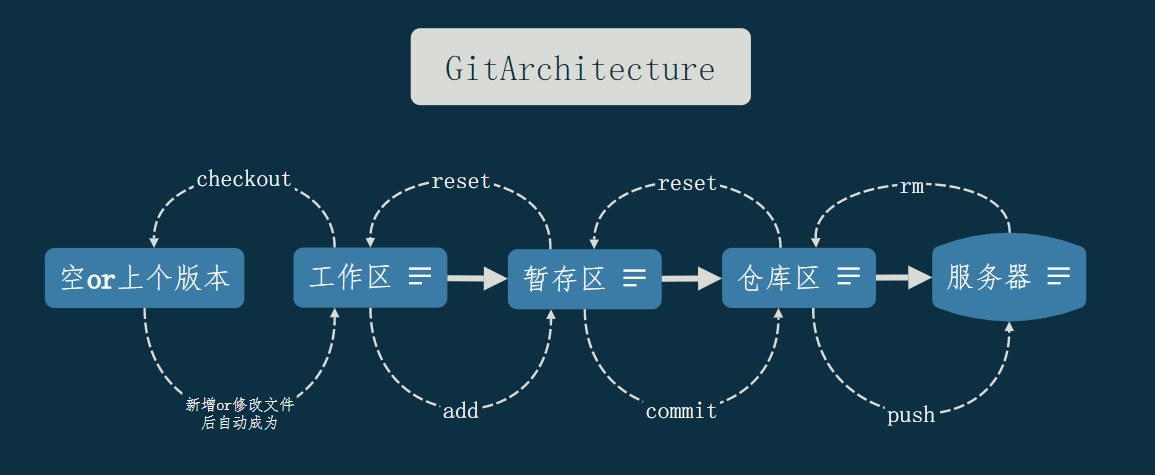
本文记录 Git 的常用命令,完整命令见官方文档 。下面的图和表概述了 Git 的整个逻辑框架。
| 工作区 |
暂存区 |
仓库区 |
| 内容的编辑区域 |
变动的保存区域 |
版本的生成区域 |
下面将会从「查看、配置、迭代、回溯、分支」五个方面介绍 Git 的命令。
查看
查看状态
查看日志
| # 从当前版本开始查询 commit 日志
git log
|
| # 查看所有 commit 日志
git reflog
|
查看差异
| # 查看工作区与暂存区的差异
git diff <FileName>
# 查看两个区域所有文件的差异
git diff
|
| # 查看暂存区与仓库区的差异
git diff --cached <FileName>
# 查看两个区域所有文件的差异
git diff --cached
|
配置
初始化
查看配置
| # 查看 git 配置信息
git config --list
|
| # 查看 git 用户名、密码、邮箱的配置
git config user.name
git config user.password
git config user.email
|
| # 查看代理
git config --global --get http.proxy
git config --global --get https.proxy
|
编辑配置
配置邮箱、密码、用户名:
| # 配置(修改) Email & Pwd & Username (局部)
git config user.name "xxx"
git config user.password "xxx"
git config user.email "xxx@xxx.com"
# 配置(修改) Email & Pwd & Username (全局)
git config --global user.name xxx
git config --global user.password xxx
git config --global user.email "xxx@xxx.com"
|
配置代理:
| # 配置代理
git config --global http.proxy 127.0.0.1:<VpnPort>
git config --global https.proxy 127.0.0.1:<VpnPort>
# 取消代理
git config --global --unset http.proxy
git config --global --unset https.proxy
|
配置远程服务器:
| # 连接远程服务器
git remote add <RemoteName> https://github.com/用户名/仓库名.git
# 查看所有连接的远程
git remote -v
# 修改远程别名
git remote rename <OldRemoteName> <NewRemoteName>
# 修改远程 URL
git remote set-url <RemoteName> <NewURL>
# 增加远程 push 的仓库
git remote set-url --add github https://gitee.com/idwj/idwj.git
# 删除远程
git remote rm <RemoteName>
|
取消 Git 对中文的转义:
| git config --global core.quotepath false
|
迭代
工作区到暂存区
| # 工作区到暂存区(单文件)
git add <FileName>
# 工作区到暂存区(全部变动文件)
git add .
|
暂存区到仓库区
| # 暂存区到仓库区
git commit -m '<Comment>'
|
仓库区到服务器
| # 仓库区到云服务器(常规方法)
git push <RemoteName> <BranchName>
# 仓库区到云服务器(初始配置仓库推送默认地址)
git push -u <RemoteName> <BranchName>
# 仓库区到云服务器(已配置默认推送地址后)
git push
|
| # 强制覆盖推送
git push --force <RemoteName> <BranchName>
|
服务器到本地
一键克隆整个项目
| # 从服务器克隆仓库
git clone https://github.com/<UserName>/<ProjectName>.git <ProjectName>
|
远程更新,本地未更新(方法一)
| # 抓取复制远程代码
git fetch <RemoteName> <BranchName>
# 更新本地分支
git merge <BranchName>
|
远程更新,本地未更新(方法二)
| # 直接使用 pull 命令,等价于上述方法一的两步。即先抓取,后合并分支
git pull
|
远程更新,本地也更新
| # 在将远程代码与本地合并后,再将个人修改的代码推送到远程
git pull
git push
|
回溯
取消版本管理
取消「当前版本」下某个文件的管理。如下:
| # 希望某些文件取消版本管理,但是依然保留在工作区
git rm --cached <FileName>
git commit -m 'remove xxx file'
git push
# 之后在 .gitignore 中增加上述 <FileName>
|
--cached 参数表示只删除已经 add/commit 的内容,原始文件保留,如果不加则会将原始文件也一并删除;-r 参数表示针对文件夹进行递归删除。
取消「所有版本」下某个文件的管理。有时我们会不小心将敏感文件加入到 Git 的版本管理中,并且经过不断迭代,导致曾经的所有版本都记录了该敏感文件,那么我们就得删除所有涉及到该文件的 commit 中的内容 (记得先备份):
| git filter-branch --force --index-filter 'git rm --cached --ignore-unmatch <FilePath>' --prune-empty --tag-name-filter cat -- --all
|
工作区到上一个版本
| # 取消新文件的管理 or 将修改文件回溯到上一个版本的初始状态
git checkout -- <FileName>
|
暂存区到工作区状态
| # 取消 add(一个文件),默认为 --mixed 模式,即保存修改但是从暂存区到工作区
git reset <FileName>
# 取消 add(全部文件),默认为 --mixed 模式,即保存修改但是从暂存区到工作区
git reset .
|
仓库区到暂存区状态
| # 移动 HEAD 指针到指定的版本
git reset '<commit_id>' # 默认为 --mixed,将指定版本与暂存区全部合并到工作区,暂存区清空
git reset --soft '<commit_id>' # 【更推荐】工作区不变,只是将指定版本合并到暂存区
git reset --hard '<commit_id>' # 【不推荐】工作区与暂存区全部被指定版本覆盖
# 取消上一次 comment 并进入 vim 编辑模式
git commit --amend
|
取消云端更改
在本地强制推送即可:
| git push --force <RemoteName> <BranchName>
|
分支
创建分支
| # 创建分支
git branch <BranchName>
# 远程同步
git push <RemoteName> <BranchName>
|
删除分支
| # 切换到另一个分支再进行删除操作
git switch <AnotherBranchName>
git branch -d <BranchName>
# 远程同步
git push <RemoteName> --delete <BranchName>
|
修改分支名称
| # 修改名称
git branch -m <OldName> <NewName>
# 远程同步
git push <RemoteName> <NewName>
git push <RemoteName> --delete <OldName>
|
注意:如果待改名的分支为远程保护分支,则需要先在远程服务商那里调整保护分支。
合并分支
假设想要将 A 分支合并到 B 分支:
| # 将当前分支切换到 B 分支
git switch B
# 接着将 A 分支合并进入 B 分支
git merge A
|
上述操作仅针对独立开发者,如果涉及到了多人协作开发,那么分支合并就又有别的讲究,见 多人协作那些事 中的内容。
拉取指定分支
在 git clone 后只会拉取默认分支,想要拉取其余的分支需要执行:
| git checkout -t <RemoteName>/<BranchName>
|